Take & Make Kit: Botanical Clay Mobile
Tuesday, June 1, 2021
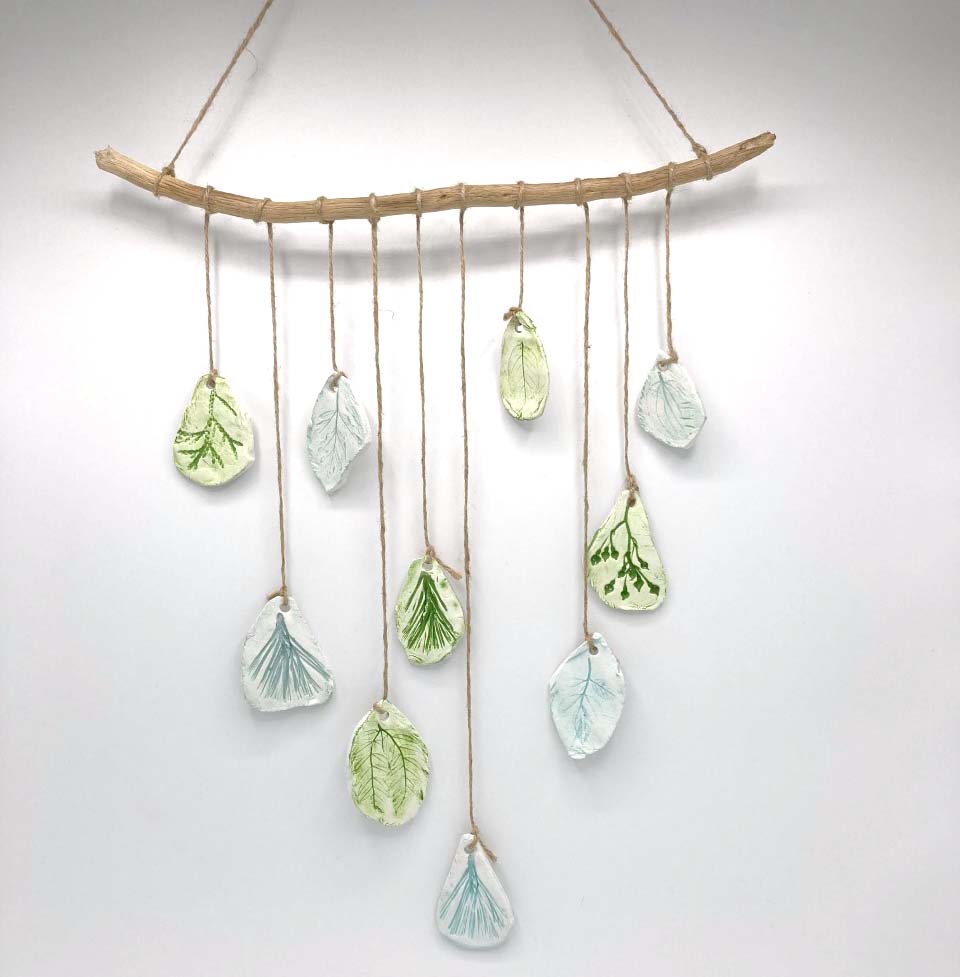
Bring a touch of nature inside with this chic mobile.
June 1, 2021
Event Information
When
THIS EVENT HAS ENDED
Tuesday, June 1, 2021
iCal /
Google Calendar
Where
Berlin-Peck Memorial Library
234 Kensington Road
Berlin, CT
Bring a touch of nature inside with this chic mobile created from clay and a few collected items from the outdoors.
Included in Kit
- Air dry clay
- Acrylic Paint (2 colors)
- Jute twine
- Straw (1)
Additional Supplies Needed
- Scissors
- Rolling pin or cardboard tube
- Knife
- Stick and several small leaves
- Paintbrush*
- Rag or paper towels
*Please contact us if you need to borrow a paintbrush to complete the craft.
Supplies are limited, so place your hold as soon as possible. Once all of the kits are reserved, there will be a waiting list. If a kit is not picked up after 5 days, it will go to the next person on the list.
Registration opens Thursday, May 27. Once you’ve placed a hold, kits will be available for pickup Thursday, June 10.

Instructions
Step 1: Collect your botanical items.
Find a stick or a piece of driftwood that’s approximately 12-14 inches long. Collect 10-14 small leaves, ends of branches, etc. This is a great opportunity to see nature up close and in a different way! Look for items that are relatively small – the final size should be no more than 2 inches, but you can start with something larger and trim or pull off extra leaves or needles. Our sample uses a variety of leaves, pine needles, wild rose buds, and arborvitae.
Step 2: Roll out clay.

Using a rolling pin or cardboard tube, roll out your clay to approximately ¼” thickness. The thickness doesn’t need to be exact, but you’ll need enough depth to press your botanical items into the clay.
Step 3: Place leaves on clay and press.

Place the leaves onto your clay, making sure to leave room for a hole at the top of each piece and enough room to cut around each item with a small border. Once items are placed, press each item gently into the clay using your fingers. After items are positioned as desired, roll over the entire surface with the rolling pin to make sure that each is firmly indented in the clay. Don’t press too hard – you don’t want to thin out your clay or push any deeper items all the way through!
Step 4: Cut out individual shapes.

Using a butter knife, cut around each leaf, leaving room at the top for a hole and a small border. Use your fingers to smooth out any rough edges. Repeat with all remaining shapes. If you have clay left over, repeat steps 2-4 until you run out of clay.
Step 5: Remove botanical items.

Gently remove all leaves and other items from the clay pieces you’ve cut out. If it looks like any item hasn’t left an imprint, roll out the clay and try again. Keep in mind that even a delicate imprint can show up nicely once the paint is added.
Step 6: Make a hole for hanging.
Press the end of the straw into the top of each clay piece to create a hole for hanging.
Step 7: Dry clay pieces.
Set all pieces aside to allow the clay to dry thoroughly. The clay will turn whiter as it dries, so make sure you check that it is completely dry before proceeding with Step 8. Depending on the thickness of your pieces, this will take approximately 20-24 hours.
Step 8: Paint and wipe.


Dampen a rag or several paper towels. Working one item at a time, use a paintbrush to paint the top surface of each clay item, making sure that paint gets in all indented areas. Immediately use the damp rag to wipe off excess paint. The goal is to remove paint from the borders and raised areas while leaving it in the indented areas. After you’ve removed most of the excess paint, you can follow up with a dry cloth or paper towel to remove more paint if desired. You can also paint the edges of each piece if desired. Set aside to dry and repeat with all other items. OPTIONAL: After paint has dried, seal each piece with ModPodge or similar clear sealer to make pieces waterproof.
Step 9: Prepare stick for hanging.

Using a length of jute twine (our sample used approximately 18 inches), tie the ends of the twine near the ends of the stick and knot on the back side of the stick. Trim any excess twine. OPTIONAL: Use a bit of hot glue to secure the twine on the back.
Step 10: Plan placement of pieces.

Spread out your stick and clay pieces on a table and decide where you would like each piece to hang. Varying the height and color of pieces will create the nicest final piece.
Step 11: Cut twine and tie pieces to stick


Cut appropriately sized lengths of twine to hang each clay piece from the stick, leaving enough extra to tie a knot at each end. Tie once at each end and adjust height and placement. Knot each piece of twine at both ends and trim excess twine. OPTIONAL: Use a bit of hot glue to secure each twine piece and any ends to the back of the stick.
Note: If you don’t seal your clay pieces, make sure to hang your piece somewhere it will remain dry.
More Crafts!
Library crafts are available while supplies last. Check out the Crafts page for a complete list of what’s available!
Photo and Video Disclaimer
The Berlin-Peck Memorial Library, as a public place, reserves the right to photograph and record groups and individuals using library services and attending library programs, and to publish those photographs and videos publicly in its newsletter and on social media outlets. Please contact 860-828-7125 with questions.
Accommodations Statement
If you require special accommodation for any library sponsored event, please call 860-828-7125 or email library@berlinpeck.org at least ten (10) days prior to the event.
Botanical Clay Mobiles
Instructions for the Botanical Clay Mobiles Craft